How to Layer Fall Outfits

Featured

Winter Outfit Idea

As the later half of fall approaches and temperatures tend to get chillier, it’s the perfect opportunity to layer-up your outfits and step up the chicness with cute overcoats. I put together this everyday layered fall look with pieces you can find on www.shopspring.com. Here are my top 3 tips on how to layer your fall outfit.

Start With a Basic

Basic long and short-sleeved tees can go a long way, so I always have a few different colours stocked in my closet. Start with a basic plain shirt and then work your layering up from there. This Aether V-Neck shirt is the perfect base piece for layering because it’s soft an made from breathable materials.

Over-sized and Chunky Sweaters are Your Friend

Over-sized and chunky sweaters over fitted shirts instantly make for a cool layered look. This French Connection knit is long, cozy, and adds an extra layer of warmth. You can also add a belt on top of a chunky sweater to give your outfit more shape.

Don’t Forget to Accessorize!

Accessories can also be used to add layers to your outfit. This double strapped Marc Jacob watch makes for some cute wrist candy! You can always throw on some necklaces or chokers to add to your layers.

What is your go-to layering piece?

Shanel Signaure

Friday Night Live at the ROM | DIY Leaf Print Shirt

Featured

DIY Print ShirtFall has always been my favourite season, it’s so scenic. I love walking down the street admiring all the beautiful changing colours of the trees, and suddenly a gust of wind blows and the leaves surround me falling delicately to my feet. It makes me happy just thinking about it.

FallPhoto

This leaf print DIY shirt is a great way to enjoy fall and all it’s beauty, and as a Canadian it made me feel a bit patriotic with the maple leaf being a part of our flag.

DIY Leaf Print Shirt

Green Graffitti copy

The inspiration for this DIY came to me when I attended one of my favorite events, Friday Night Live at the ROM. FNL has returned (another reason why I love fall!) and it runs until November 27th. Every FNL has a theme and last weeks was Thank You Canada. As a sponsor of the event Ford provides fun costumes and props that go along with each weeks theme. My friend Justine and I had a blast dressing up in “Canadian attire” and throwing leaves around. This Fridays theme is Dig it! It’s all about archaeology you can check the FNL event schedule here.


ROM Thank You CanadaJustine & I having fun at #FNL

Continue reading for the DIY

The Supplies

DIYSupplies

A Shirt
Leaves
Fabric Paint
A Paint brush
Piece of cardboard
A tray

The Steps

The first thing you will need to do is collect some leaves of varying sizes. This was a lot of fun! I went to a park named Trinity Bellwoods and found some leaves that had just fallen off the trees. The fresher the leaf the better, don’t collect the dried leaves as they are more prone to cracking and breaking when you paint them.

Pickingleaves

throwingleaves

If you’re not going to do the DIY within a few days, store the leaves in a zip lock bag and keep them in a book so they don’t dry out and they will be nice and flat when you’re ready to use them.

Fall Leaves

Put the piece of cardboard inside the shirt, so the paint doesn’t seep through to the other side.

Layout the leaves on the shirt from largest to smallest, or whichever way you prefer.

Fall shift DIY1

Pour some paint onto a tray and dip the paint brush in. Hold the leaf in the middle and paint all around the edge of the leaf.

Shirt DIY 2

Repeat for the other leaves.

Shirt DIY 3

Remove the leaves and let the paint dry, and voila you’re done!

Shiry DIY 4

Shirt DIY 5

Graffiti1Shanel Signaure

My Top Summer Accessories

Featured

You can wear these looks any time during year, but with sun, fun and longer days these accessories are the perfect way to top off your summer outfit. Here are my favorite summer accessories and some suggestions on where you can find them.

Henna Tattoos

DSC_0800

If you follow me on Instagram you probably already know I adore henna tattoos. The use of henna for body art has been used for centuries, and can be traced back to ancient India. Used as an art form for Indian weddings and other ceremonial celebrations, henna is now worn by people of all cultures. The intricate designs can last up to 2 weeks and are traditionally put on the hands and feet, but you can have it applied almost anywhere on your body.

Where you can get it: In Toronto there are often henna artists with tents set up at street festivals. You can also search on online classifieds such as Kijiji and Craigslist for local henna artists, or if you have a steady hand, you can purchase some henna paste and do it yourself.

Choker Necklaces

Black Chocker Necklace

Choker necklaces are a simple accessory which can pair well with a lot of outfits, they’re especially cute with strapless items. I’m loving that the black tattoo necklaces have made a come back.

Where you can get it: I found my choker necklace at the dollar store (Dollarama), but I have also seen them at accessory stores like Clarie’s.

Anklets & Foot Chains

IMG_7301

Anklets and foot chains are great because it’s a chance to accessorize the lower half of your body. Both are perfect for wearing at the beach, and if you want to step it up you can also pair them with your favorite flats or heels.

Where you can get it: There are many hand-made foot chain styles to choose from on Etsy. Also, Forever 21 has a selection of anklets.

Metallic Tattoos

Metallic Tattos

Metallic tattoos are a quick and easy way to add some shine and shimmer to your skin. They’re great for places like the beach, or when you don’t want to wear a lot of jewelery but you still want to accessorize. Simply cut out the design you like and place it face-down on clean and dry skin. Using a sponge or cloth add some water to the back and hold in place for about 30 seconds. Remove the paper and you’ve got some skin bling.

Where you can get it: Flash Tattoos is a popular brand. A quick Google search of “metallic tattoos” will also generate many websites and stores which also carry them.

What are some of your favorite summer accessories?

Shanel Signaure

DIY Paint Print Jeans

Featured

DIY Paint PrintJEANS
Photo by Ljubomir Pavkovic

Fabric paint is a really great tool to work with, there are so many patterns and designs you can create to spruce up any piece of clothing. That’s why I was happy I had some on hand for these DIY paint print jeans.

I had put on these white jeans and I was about to head out when I noticed there were blue stains all over the back. I had accidentally stored them under a pair of dark wash jeans, so some of the blue dye had rubbed off on them, whoops! I was a bit upset that my white jeans were now ruined, but with a bit of thinking I knew I could DIY them into something new. Continue reading for the DIY below.

DIY Paint Print Pants back
Photo by Ljubomir Pavkovic

The Supplies

DIY Print Jeans Supplies

Jeans
Fabric Paint
A Tray
Sponge
Paint brush
Tape
2 Garbage bags

The Steps

Lay your pants on a flat surface, take a garbage bag and pull it through the pant leg (so that the paint doesn’t soak through to the other side), do the same for the other leg.

Put some fabric paint on the tray and dip the sponge into the paint. Take the brush and evenly distribute the paint onto the brush.

DIY Paint Print Jeans 1

Take your sponge and press it paint-side down onto the pant starting from the bottom. Since the first application has fresh paint, press lightly and then gradually increase the pressure on the sponge.

DIY Paint Print Jeans2

Continue pressing the sponge down onto the pant until there is no more paint coming off the sponge.

Reapply paint to the sponge and evenly distribute with the brush. Again, press the sponge onto the pant.

IMG_7946

Continue the last 2 steps until you’ve painted the front of the pants.

DIY Print Pants 4

I decided I wanted to have a different colour around the pockets so I left the area unpainted. I added some pink paint to a brush and painted around the top part of the pockets.

DIY Print Jeans 5

Let the paint dry completely. Flip the pants over and sponge paint the backside of the pants. If you would like to add a second colour to the back pockets like I did. Leave the area unpainted. Let the paint dry completely.

DIY Paint Print Pants 6

Add the tape across the back pockets and then tuck the garbage bags into the pockets. With the paint brush paint the second colour up to the tape line.

DIY Print Pockets 7

Let the paint dry and then remove the tape.

DIY Print Pants 8

Voila, you’ve got yourself an almost new pair of pants.

-Shanel
Let’s Connect:

InstagramTwitterEmail

DIY Clear Tote Bag

Featured

DIY Clear Hunter Bag
Photo by Kristen Berk

This DIY clear tote bag was inspired by the clear Hunter tote which I spotted while scrolling through Nasty Gal’s Instragram. A few days after, I had just finished putting on my new bed sheets and I was about to throw out the packaging when a light went off in my head. I realized it was the perfect base to create a DIY version of the clear Hunter Tote!

Clear Hunter ToteImage Source: Nasty Gal Instagram

Ladies, you know the pain of having your bag feel like a big black hole that items seem to disappear into? You have to dig and shift your stuff around to find that one thing? That’s why I really love this bag! Because it’s clear I can see everything I no longer have to frantically search for my lip gloss. If you’re not comfortable with all the contents of your bag showing you can put a smaller purse or clutch inside the clear bag for items you want covered.

ClearbagDIY

Clear Tote Purse Bag DIY

Brick Wall Clear Bag Tote

Here’s how I made it.

The Supplies

DIY Clear Purse Supplies

Transparent bed sheet case
2 Strips of material or ribbon
Hand hole punch
Marker
Glue

The Steps

On the top side of the bag I used the marker to draw a small dot for the location of the straps. I used the length of my thumb as measurement.Clear Purse DIY 1

Using the length of my thumb again, I drew another small dot on the other side of the bag.Clear Purse DIY3

I repeated the last two steps for the other side of the bag, so there were 4 dots total.

I took the hole punch and punched a hole where each of the 4 dots were drawn.Clear Purse DIY 4

I took a strip of material and measured it around my shoulder to see the best length for the straps, I made sure there was about an extra two inches of length (you have to knot the ends of the straps which takes away from the length). Once I had the length I wanted I cut another piece of material to the same size.

I pushed each of the straps into each hole on one side of the bag.DIY Clear Hunter Bag 6

On the inside of the bag I triple knotted the end of the strap so that the knot could not fit through the hole. I repeated the same step for the other hole.DIY clear purse 7

I took the straps making sure they were straight and I brought them over to the other side of the bag. I repeated the knotting process with the holes on the other side.DIY Clear Purse 8

I added a dab of glue to the inside of the knot and glued it to the side of the bag. I held the knot to the bag for about 30 seconds. I repeated the gluing process for the other 3 holes.

I let the glue dry and that was it!DIY Clear Tote Purse 8

DIY clear tote purse bag 2

Clear Tote Bag DIY

– Shanel

Divalicious 7 & Style Tips On How to Wear All White

Featured

Tips for wearing all-whitePhoto by Vincent Dayrit Photography

All white ensembles are a classic fresh look for the summer months. I recently attended an all-white party for the Divalicious 7 birthday bash. Myself along with a few other local bloggers were invited to model an all white outfit from Toronto designers.

The event was hosted by DivaGirl Inc, which is an all female community dedicated to empowering women through fun and engaging conferences, events, and workshops. It was a great time! There were performances, vendors, henna and champagne. Here are a few photos from the event.

Continue reading below for my tips on how to stylishly wear all white this summer.

IMG_7881Dance performance by the DivaGirl Cabaret

11401063_10150494477779982_7848864243580940868_n

Me getting some henna done while wearing beautiful Stella & Dot accessories. Photo by Vincent Dayrit Photography

IMG_7871

Shop for Jayu accessory table

Style Tips for All White1

Bloggers being models for the day

IMG_7877

With different shades of white and varying textures it can sometimes be difficult to pull off an all white ensemble. As long as you stay away from the red wine, all white outfits can be easier to pull off than you think. Here are some style tips for wearing all white this summer.

 Mix up textures

Jessica Alba All White
Photo Eonline

Add dimension to your all white ensemble by mixing up textures. If you’re wearing something made of a heavier material like denim or cotton, pair it with a lighter material such as a linen or something sheer to balance everything out. Sheer materials also pair great with off-white items.

Matching Set

All White Matching Set Reese Witherspoon
Photo People

If you want to make sure your all white outfit is on-point, invest in a matching set such as a tailored two-piece or matching top and skirt. You can always mix and match the pieces and wear separately. You can count on the set as a go-to source for when you need an all white outfit in a hurry.

Show Some Skin

Nicole Scherzinger All White
Photo Express

If you’re comfortable with showing some skin, break up your all white outfit with a crop top and high waisted trousers or skirt. Ripped white jeans can also be a fun way to show a bit of skin and add texture. For the more reserved, clothing with sheer and crochet materials are another great option.

Add some accessories

Wearing all white Rihanna
Photo Daily Mail

Since all white ensembles are pretty much a blank canvas for accessories, use them as a way to dress-up or dress-down your outfit. Layering metallic jewelry can look really chic with an all white outfit.

Shoes, shoes, shoes!

1C989C15
Photo People

If you want to achieve a total monochromatic look and you don’t own white shoes, go with a neutral or tan coloured shoe to finish off your look. If you’re going to wear a darker coloured shoe go for a strappy style heel or sandals with smaller or light straps so it doesn’t over power the outfit.

How do you like to wear all white?

– Shanel

Fun, Fashion & Friday Nights at the ROM

Featured

IMG_2763

Friday Night Live, or FNL for short is a popular event series hosted by the Royal Ontario Museum. Last week Friday I was invited to attend, and as a regular FNL attendee I’ve noticed a reoccurring theme; it tends to bring out a very fashionable crowd. With FNL’s weekly themes and the ROM’s beautiful architecture, it can be easy to understand why people come out ‘dressed to the nines.’ So you’re not into fashion? Don’t worry as there isn’t really a dress code, but with top DJ’s, performances, dancing, and bar and food stations scattered amongst the dinosaur fossils and exhibits, it definitely gives off a club vibe (minus the pretentiousness). FNL is an event that has something to please everyone because there so many different sights and activities. Here are some photos and a recap of my last FNL experience.

Clark&Amanda

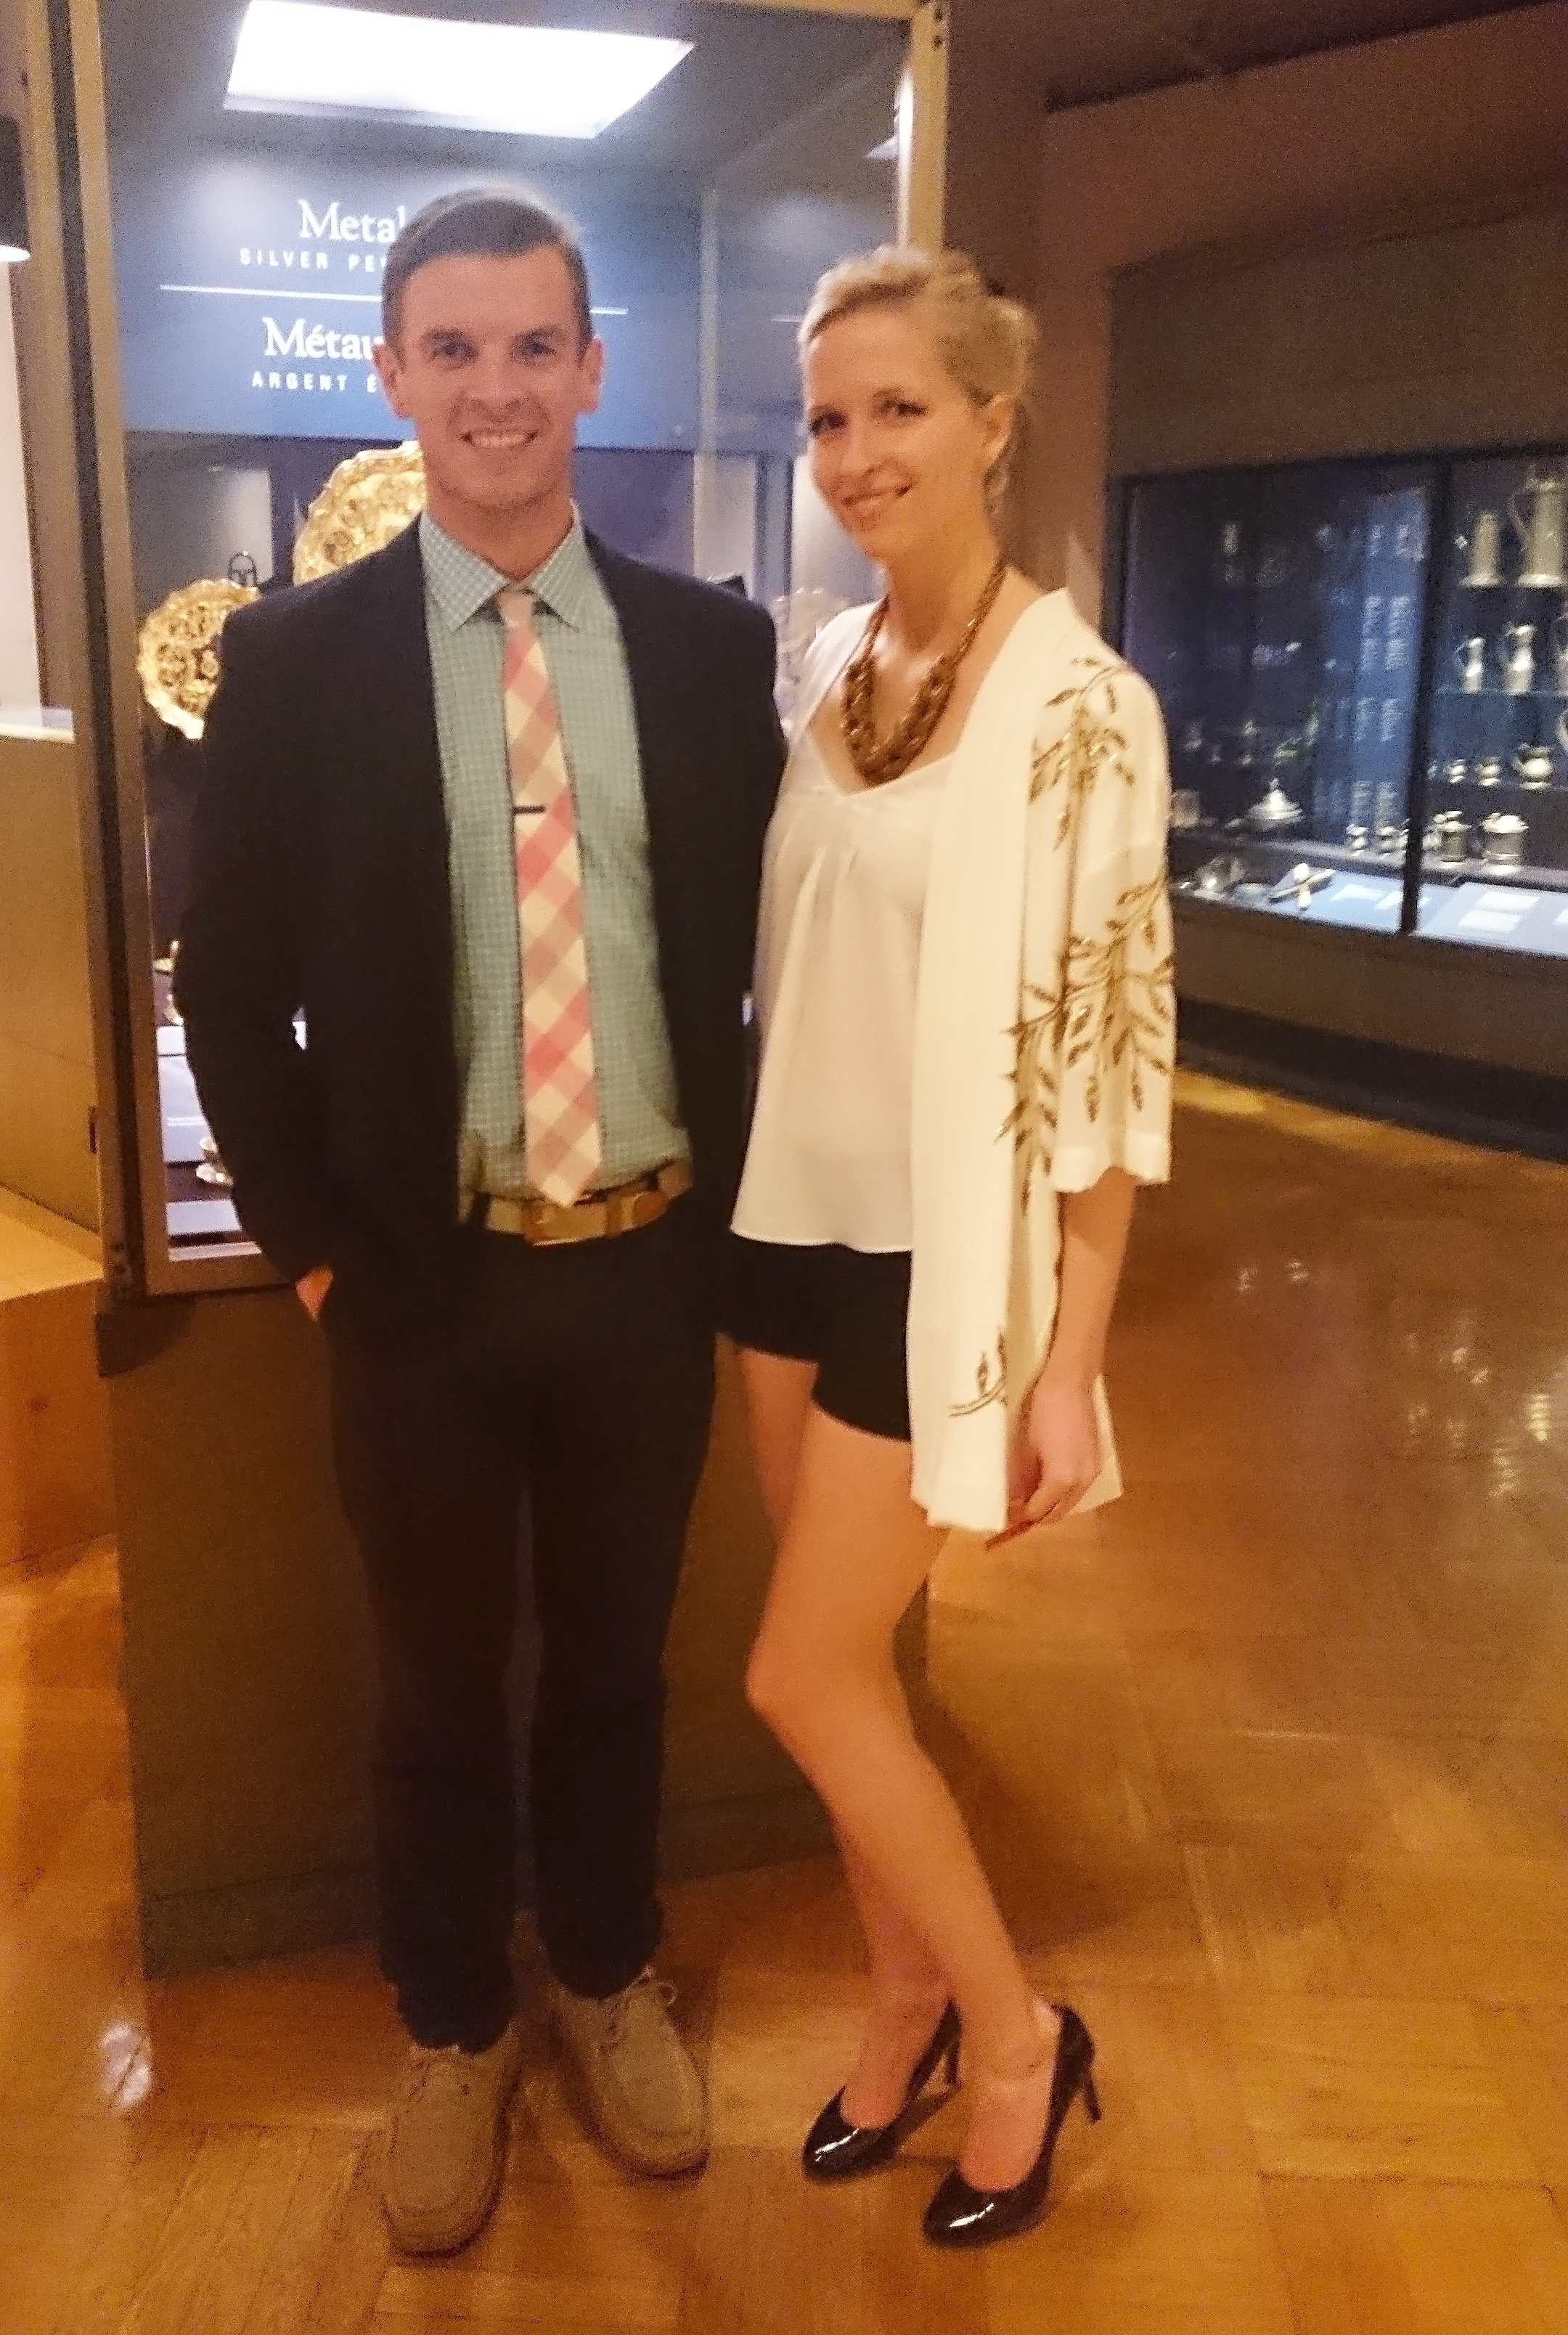
#FNLRom attendees Clark & Amanda looking very dapper

FNLrom Farah

#FNL attendee Farah looking fashionable

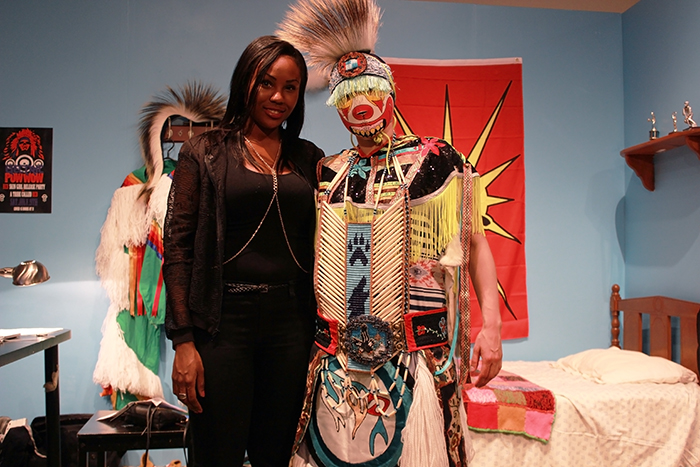
Each Friday line-up includes a different theme that is incorporated into the events entertainment and exhibitions. Last Friday’s theme was Indigenous Now, which celebrated contemporary Canadian Indigenous Art through artists and performances. As my friend Kristen (Twenties and Fabulous) and I wandered around we were able to catch the very end of an improv performance by Indigenous theater artist, Theo. She was in full traditional clothing which she handmade herself over the course of 6 months. I really admired the intricacy and detailing of the whole outfit, which was lined with colourful beads, fur, and fringes.

Theo FNLrom

Indigenous Artist, Theo on set

Shanel&Theo FNL

After Kristen and I finished chatting with Theo, there was another interactive Q& A style performance, which encouraged the audience to ask an Aboriginal woman questions they had about Indigenous culture. No topic was off limits, so the discussion was really insightful.

FNLrom

With all the action going on inside of the ROM, it can be easy to forget that you’re inside a museum. There is so much beautiful architecture and design in the building which makes it the perfect set up for a photo-op, which is exactly what Kristen and I took a moment to do.

Shanel FNLrom

Me striking a pose

Kristen FNLrom

Kristen & the ox

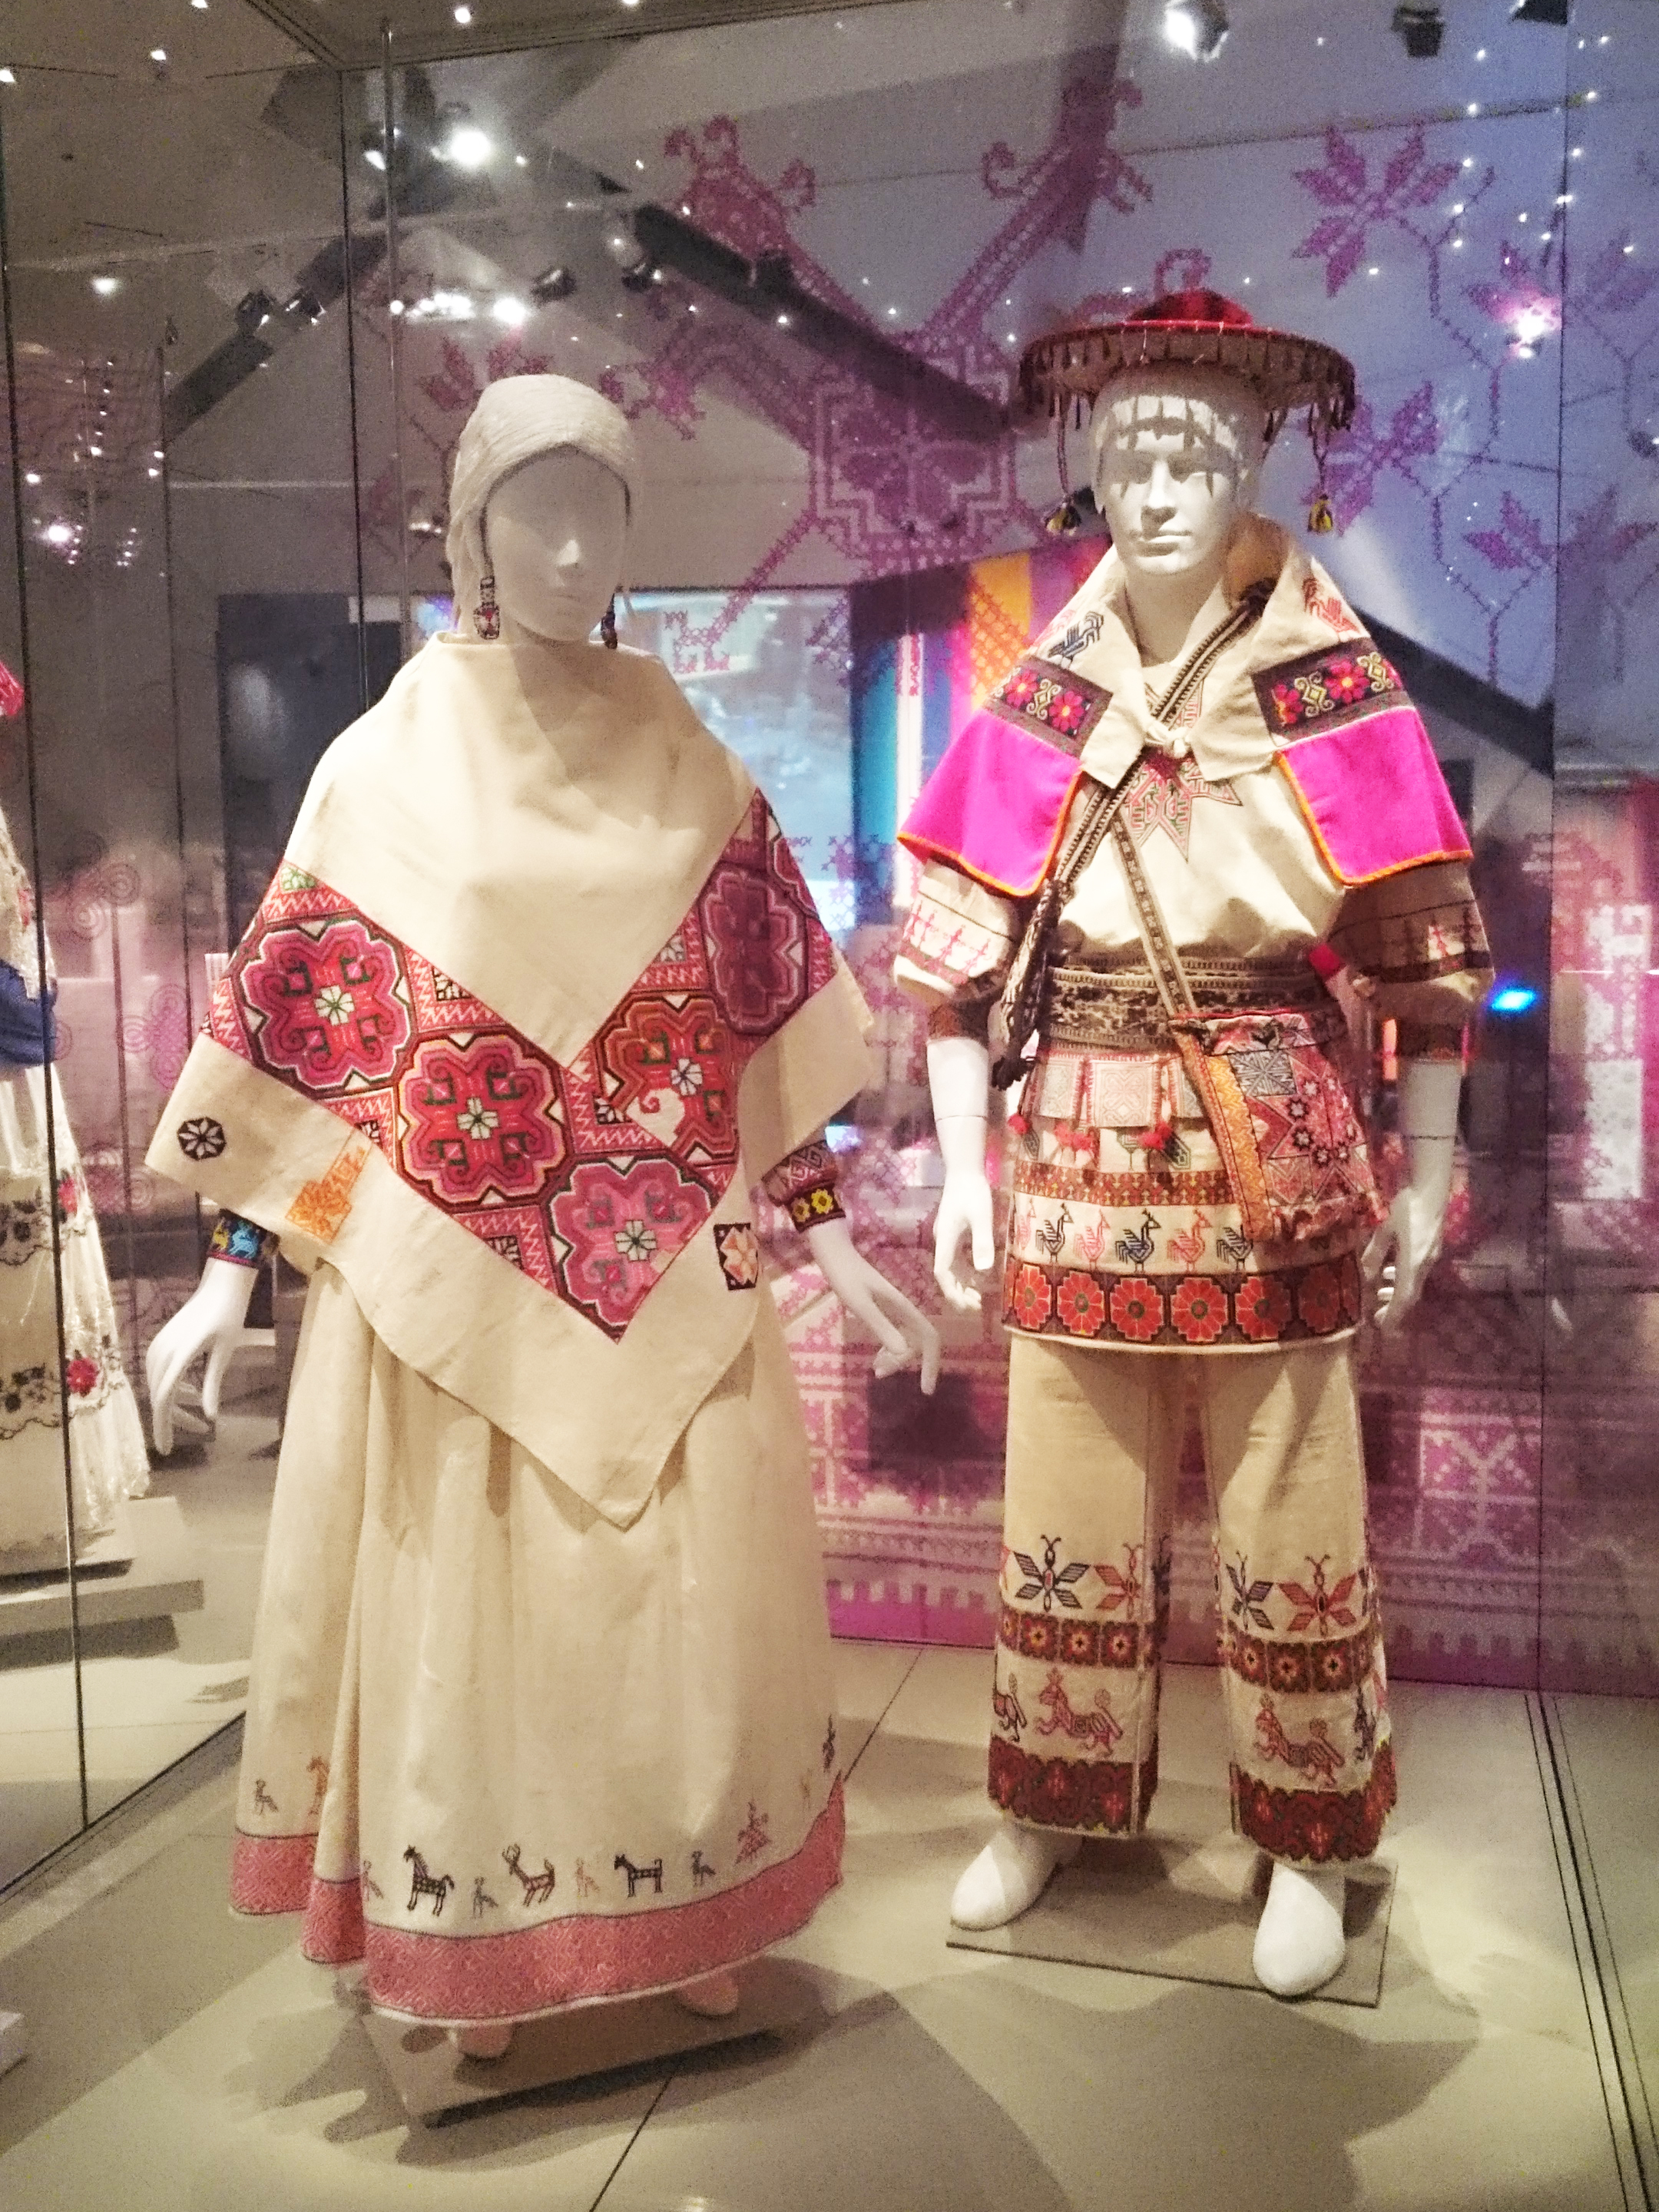
Next, we visited the ROM’s featured exhibition, ¡Viva México! Clothing & Culture. The exhibit showcases hundreds of historic and contemporary Mexican pieces from the 18th – 21st centuries. The pieces ranged from costumes, textiles, and embroidery. I loved the vibrant colours, floral prints, bead work and varying textures found throughout the outfits. After doing some reading, I found out the elaborate outfits hold a strong cultural significance. They were worn by Tehuanas woman in the 1920s to project femininity and to display national pride after post-revolutionary leaders rejected European values.

FNLrom Viva Mexico

Tehuanas outfit, huipil (tunic), enagua (skirt), and huipil grande (starched lace headdress)

FNLrom Viva Mexico 2

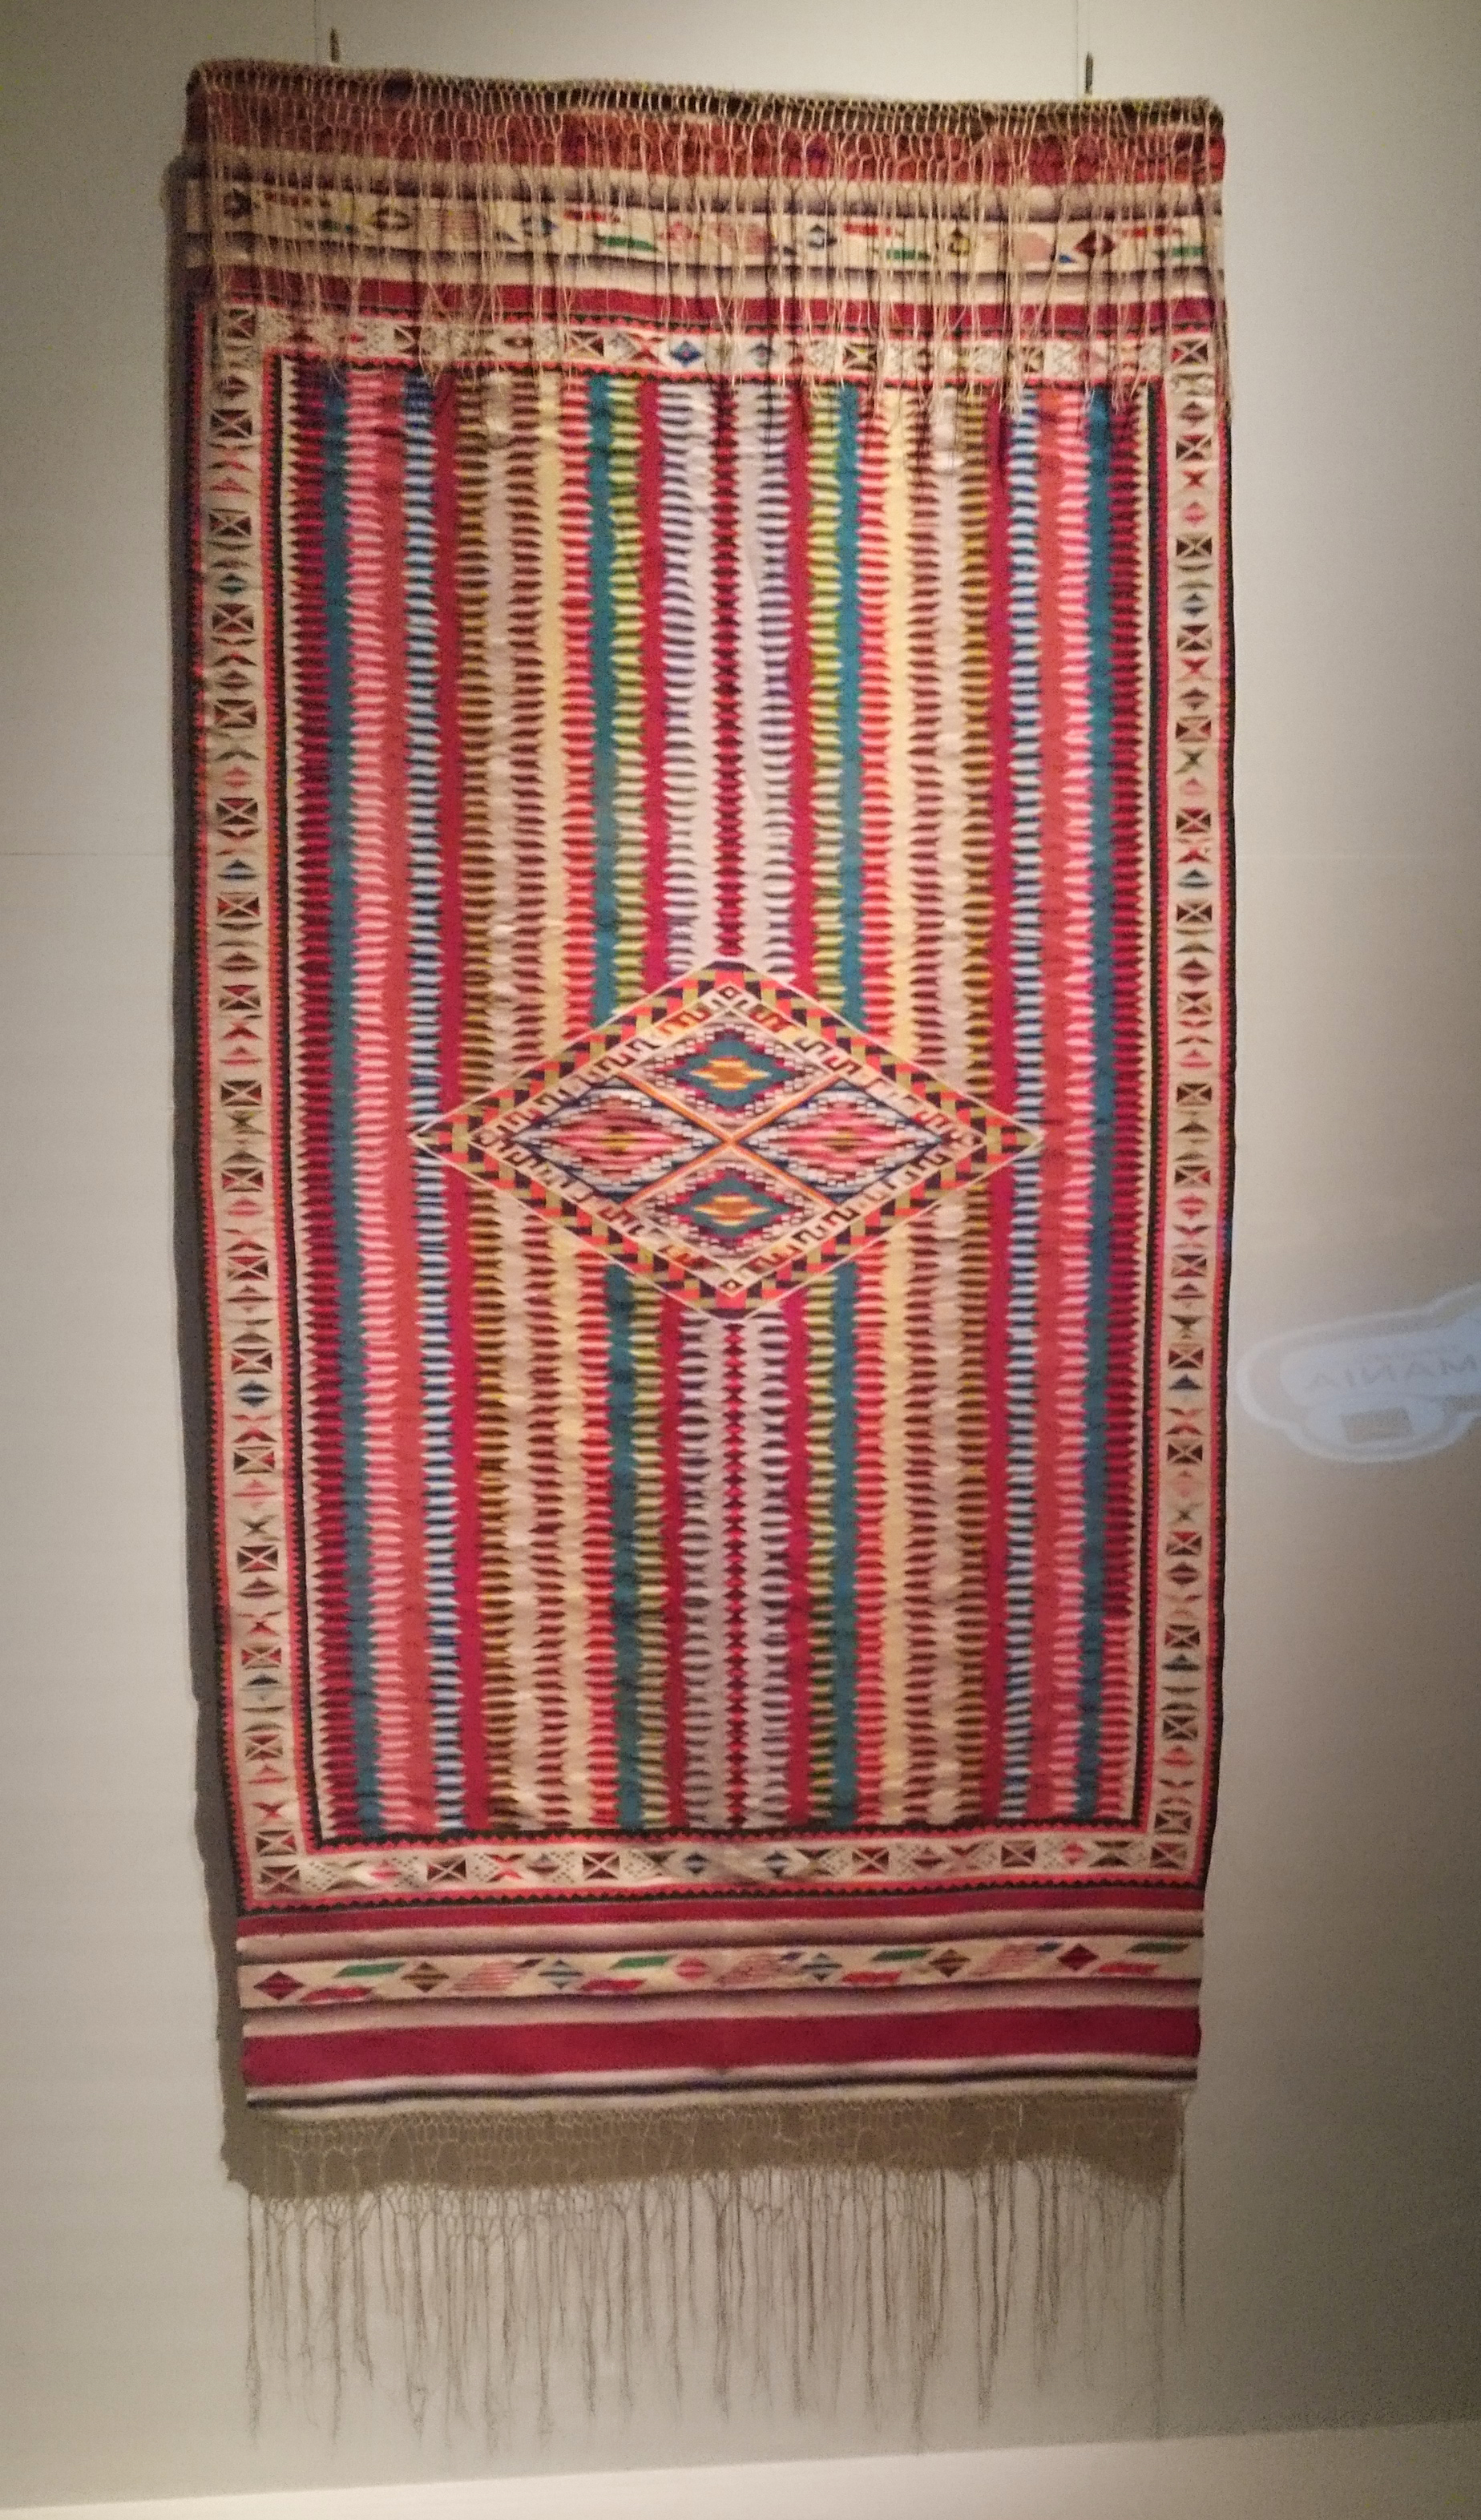
We also took a peak at the sarapes which are textiles dyed with all natural colourants from plants and insects. The main colours of red, blue, and yellow were mixed to make secondary colours. Some of the dying processes have been used in Mexico for over 2,000 years! I was so inspired by the artistry and creativity throughout the event, it made me really appreciate the skill and precision that go into making the items.

FNLrom Textile dye

Colourful sarapes

FNLrom Sarapes

After we finished gawking at the beautiful outfits, we made our way to the first floor where we danced and looked for our photos on the photo wall. The interactive photo wall displays photos in real time if you use the hashtag #FNLRom on your Instagram and Twitter. It’s always fun to see peoples varying experiences captured throughout the night. And you can’t help but get a bit excited when you catch a glimpse of your photo blown up on the wall of the museum.

As the night came to an end I decided to snap a few more photos of the well-dressed patrons, and this is how I was able to briefly meet another one of the artists, Summer Garcia. I ran up to her to compliment her on her outfit, and when we started chatting she mentioned that her exhibit Aasooke, was on display in the Bronfman Hall. Summer’s installation creatively combined photography, makeup artistry, and digital mixed media.

Summer Garcia FNLrom

Artist Summer Garcia looking fashionably chic

There are only 3 more weeks left for FNL until it returns for the fall season. This Fridays theme for FNL is Toga Toga! Which is a celebration and sneak preview of the ROM’s newest exhibit, Pompeii: In the Shadow of the Volcano. If you’re in the Toronto area and haven’t been yet I definitely recommend you check it out! You can find out more information about upcoming FNL events here.

– Shanel

DIY Fringe Ankle Cuff

Featured

DIY Fringe Cuff

I’m loving all the fringes I am seeing pop up on everything from dresses, clutches, and shoes. Fringes are fun, flirty, and they can add cool movement and lines to an outfit.

Since DIYing fringes involves a lot of cutting I decided on a simple DIY fringe ankle cuff. Doing this project made me wish I owned a shredder so I could shred fabric to make fringes on command. I would add fringes to everything!

This DIY fringe cuff pairs great with gladiator style sandals or heels. Here’s what you’ll need.

The Supplies

DIYFringeCuff supplies

Fabric
Scissors
Ruler
Pen or Marker
Glue gun
Velcro

The size of my fabric was 6 inches high and 9 inches long.

The Steps

First, I measured the fabric around my ankle making sure there was an inch overlap. I cut off any excess material.

I folded the material in half, and used the pen to mark the half way point. I then drew a straight line across the middle of the material.

DIYfringeanklecuff02

I cut the material in half so I had two sides.

DIYFringecuff half copy

I drew a line that was ½ an inch wide across the top of the material. The line was the point I cut all the fringes up to.

You can cut your fringes to whatever size you like. I used the width of my thumb as a guideline and I began cutting the fringes up to the drawn line.

DIYFringeCuff3

Repeat the last two steps for the other side.

DIYFringeCuff6

Cut 1 inch pieces of both sides of the Velcro. Glue one side of the Velcro on the front side of the cuff.

DIYFringleCuff7

Turn the cuff over, and glue the other side of the Velcro to the opposite end on the back side of the cuff.

Repeat gluing on the Velcro for the other cuff.

Wear it!

IMG_7788

Shoes: Material Girl

-Shanel

5 Style Tips on How to Wear Coloured Jeans during Winter

Featured

During the colder months my wardrobe can sometimes be a bit drab. I tend to wear a lot of black and grey, while items like my coloured jeans shift to the back of my dresser. I came to this realization a few weeks ago when I met with my friend and fellow blogger Kristen (check out her blog Twenties and Fabulous). She was wearing a nice pair of coloured jeans, and they looked great.

Coloured jeans are a great statement piece for any season. It’s all about keeping your outfit in proportion since brighter coloured pieces are typically associated with spring or summer. You don’t want to look like your ready for a picnic when it’s the middle of February.

Howtowearcoloredjeans

Here’s 5 tips on how to style and accessorize your coloured jeans during winter.

Chunky Knit Scarf. This is a great way to winterize your outfit and add layers when the temperature starts to plummet.

colouredjeanandchunkyscarf

Image source

Over-sized Sweaters. Neutral coloured sweaters in black, grey, cream etc. balance out coloured jeans, while keeping you warm in style.

Colouredjeansandchunkysweater

Image source

Hints of Leather. A top with leather accents, a leather vest, or accessories help chic up the look and add a wintery feel.

This top from Rudsak’s would pair great with coloured jeans.

Rudsak Hope Shirt

Image source

Fur it up. Nothing says winter like fur. Add a faux fur vest, scarf, or clutch to your look.

Fauxfurandcolouredjeans

Image source

Over the knee boots. A great winter accessory. Coloured jeans with over the knee boots add a hint of colour and a sexy edge for a fun winter look.

Coloredjeansandoverthekneeboots

Image source

How do you like to add colour to your winter outfits?

-Shanel


Let’s Connect:

InstagramTwitterEmail

DIY Graphic Print Shoes

Featured

PaintedShoesDIYcover

The wardrobe transition has started. It’s that time of year to swap the sandals for closed toe shoes and boots. While I’m clicking my heels together wishing for another week of summer weather, I decided to revamp an old pair of flats and give them a new look. Read on to learn how.

The Supplies

A pair of shoes
Acrylic paint. If your shoes are a fabric material like Chuck Taylors use fabric paint instead.
Paint brushes
Small bowl
*Clear drying finish such as Mod Podge Outdoors

*If your shoes are made of fabric material skip the finish.

The Steps

Clean the shoes making sure they are free of any dirt or debris.

PaintedShoeDIY

Pour some paint into the bowl, using the paint brush create whatever design you like. You can customize your shoes by splattering the paint or creating polka dots. I created my design by putting a big blob of paint onto the shoes and then I used the paint brush to spread the paint to create lines.

Let the paint dry.

DIYshoesdrying

Once the paint is fully dried. Use a large paint brush to paint on the finish, leave to dry for 24 hours.

PaintedShoesDIY3

And you’re done!

PaintedShoesShanelpaintedshoes

-Shanel