DIY Embellished Sweater

Featured

diysweaterrefashion
As winter quickly approaches I’m slowly entering a hibernation phase which has led to a lot of cleaning and organizing. I was going through my clothes when I realized I had  FOUR plain grey sweaters that look almost identical, so it’s only natural that I had to DIY one. As I did some more cleaning of my craft stash l found a bunch of left over gems from this DIY Jewel Frame, and so this project was born.

I loved how this DIY sweater embellishment turned out. The supplies and steps are very minimal, but with different coloured embellishment and layouts you can create a really unique look.

The Supplies

2 Different coloured Gems
Fabric glue
A small Stick
A piece of scrap cardboard or bristol board

DIYSweateremblishmentsupplied

The Steps

Lay your sweater on a flat surface. So you don’t glue both sides of your sweater together, place the scrap material on the inside of your sweater.

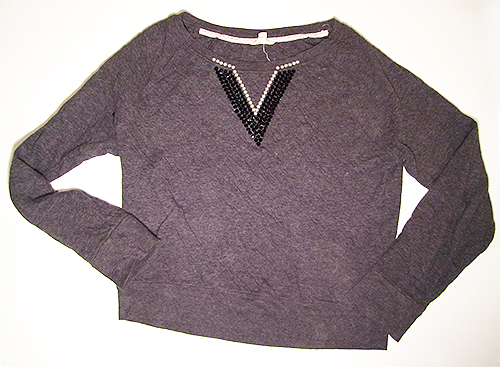
Take your gems and layout your design. I tried a few before I decided on a “V” shape.

Emblishmentlayout

Begin gluing down your gems. Use the stick to press down on them.

DIYEmblishmentgluing

Let it dry.

DIYSweaterembellishment

How do you like to add some sparkle & shine to your outfits?

-Shanel

From Day to Night, Ways to Wear Your Little Black Dress

Featured

The Little black dress or LBD is an essential clothing staple for any females wardrobe. Black is flattering for any figure, and it’s a blank canvas that you can easily dress up or down regardless of your style. I love the LBD because it’s versatile enough to take you from a day of coffee to a night of cocktails. 2 looks from 1 dress, how can you lose?

With the help of Style Sets from dailylook.com. Here’s my tips on how you can take your little black dress from a day at work to a night on the town.


Layers


Day

Dl-101290-black-v0Dl-98938_v0
A nicely cut blazer or cardigan can instantly polish up your LBD, and make it look more professional.

Whether your at work or running errands a patterned scarf is an easy way to add texture and a pop of colour to your LBD. Plus, if your LBD has a plunging neckline or shows a lot of skin a scarf can be an easy way to make it work appropriate.

Night
Dl-90734_v0

Adding a vest to your LBD can give it an edgier look and also add some shape to your dress.

Day & Night

73363_stick
A pair of tights can go a long way and can add some fun texture and color to your LBD.

Accessories

Day

Dl-112869-rasberry-v0

If your going to wear a bold or brightly colored patterned scarf with your LBD during the day, I like to keep the accessories to a minimum. A classic watch is a great way to finish off your look.

Night

Dl-104220-gold-v0Dl-106223-gold-v0

Have fun mixing and matching your accessories. Like I said the LBD is like a blank canvas, and accessories such as a statement necklace instantly add some shine and shimmer.

Shoes

Day & Night

Dl-104376-black-v0
Black booties with some detailing and a heel can transform your look from day to night with ease. Plus the added height from the heel can make your legs look longer.

Bags

Day

Dl-93250_v0
A dark colored chic duffel bag is the perfect size for carrying around everyday items and it’s easy to pair with a LBD.

Night

Dl-98488_v0
If you don’t want to lug around a large bag all night, keep a clutch inside of your bag to use for later. Clutches are perfect for carrying the essentials, and a statement clutch can also help glam up your look.

How do you like to wear your Little Black Dress? Try making your own Style Set at dailylook.com. It’s a lot of fun!

-Shanel

DIY Pearl & Wire Ring

Featured

DIYwireandpearlring

Lately I’ve really been loving the combo of pearls and gold. I’ve always been drawn to gold accessories, I like that pearls add more of a delicate look and a touch of femininity.

I was practicing with crafting wire when I decided to put together this DIY pearl and wire ring. Continue reading to learn how to make it.

DIYpearl&wirering

The Supplies

Crafting wire I used 20 gauge (.032 inch) wire
Pearls
Scissors
Flat nose pliers
Glue
A thin stick a toothpick will do
A circular item that’s approximately the same size as your finger

DIYringsupplies

The Steps

Cut a 4-inch piece of crafting wire.

DIYPeal&Wirering Step1

Take the end of the wire and wrap it once clockwise around your circular item.

DIYpearl&wireringstep2

Test that it fits comfortably around your finger. Make adjustments if necessary.

DIYpearl&wireringstep3

Use the pliers to bend the wire downward.

DIYpearl&wireringstep4

Bend the wire to the right, so you have a 90 degree angle.

DIYpearl&wireringstep5

Wrap the remaining wire clockwise around the circular item.

DIYpearl&wireringstep6

Again, test that the ring fits on your finger.

DIYpearl&wireringstep7

Once you have your desired fit cut the remainder of the wire off.

Add a pearl and then a dab of glue. Move the pearl to the end of the ring. Repeat on the opposite end.

DIYwire&peralringstep

Let the glue dry.

All done 🙂

DIYpearl&wireringfinalstep

– Shanel